 Growing under lights is fun. The conditions for propagation can be better controlled and your little plants will have better success when taken outside. Here I explain how I built my rig, using Sylvania Grolux fluorescent tubes.
Firstly, you have greater control over the variables. Number of hours lighting, temperature, nutrients and water (all the things a plant needs) can be better controlled than that of a greenhouse or outdoors. This is particularly useful when growing plants earlier in the year when it is still cold or frosty outside. Even when the weather picks up, a frost can return early in the season and destroy your young plants before they even have a chance to get going.
 Another advantage of growing indoors is that you have greater pest control. This is one of the major benefits, but it also has its drawbacks as we usually rely on insects to pollinate our flowers which then provide us with fruits. This is not a major problem however, as we can replace the insects with manual pollination - using a small paintbrush.
Construction

The main body of the unit is made from a simple sheet of 10mm MDF. I had the retailer cut the board in half lenthways, and then did the same again for one of the pieces. This creates 3 pieces, 2 of them half the size of the main piece. The smaller widths will become the side reflectors. The board was already 4ft in legth so I didnt have to have it cut to size.
I attached the reflector side panels to the main board by using simple metal brackets strips, which are flexible enough to be bent to allow the side panels to be adjusted. They also had holes predrilled in them. I also attached some chain links to the main board at each corner so I could link chains to them in order that it can be suspended.
The light fittings themselves are 4ft in length, but you can buy longer or shorter ones. Be sure you buy lengths that match the types of tubes you wish to use in them. I connected some 3core (including earth) electrical cable to each of the tube light fittings. The light fittings were attached to the underside of the board and the cables passed through the holes I had drilled in the main board.
 On top of the board, I added a light switch for each light (so I can choose to have one or both on) and I then passed the cables in to a junction box. The other side of the junction box has a cable coming out of it with an electrical plug on the end of it. This then plugs in to the mains via a digital timer. This allows you to control the amount of light per day. I have my lights come on at 5:30am and they shut down at 10:30pm - simulating long summer days.
If you are not competant with electrical work, then please have an appropriately trained electrician to do this for you or to check the connections. Loose electrical connections are a fire hazard.
 The underside of the board wasn't very reflective as it was wood colour. So i glued kitchen foil to the underside of the main panel and the side panels to reflect as much light back down to the plants as possible. You could also try plain white paper rather than foil.
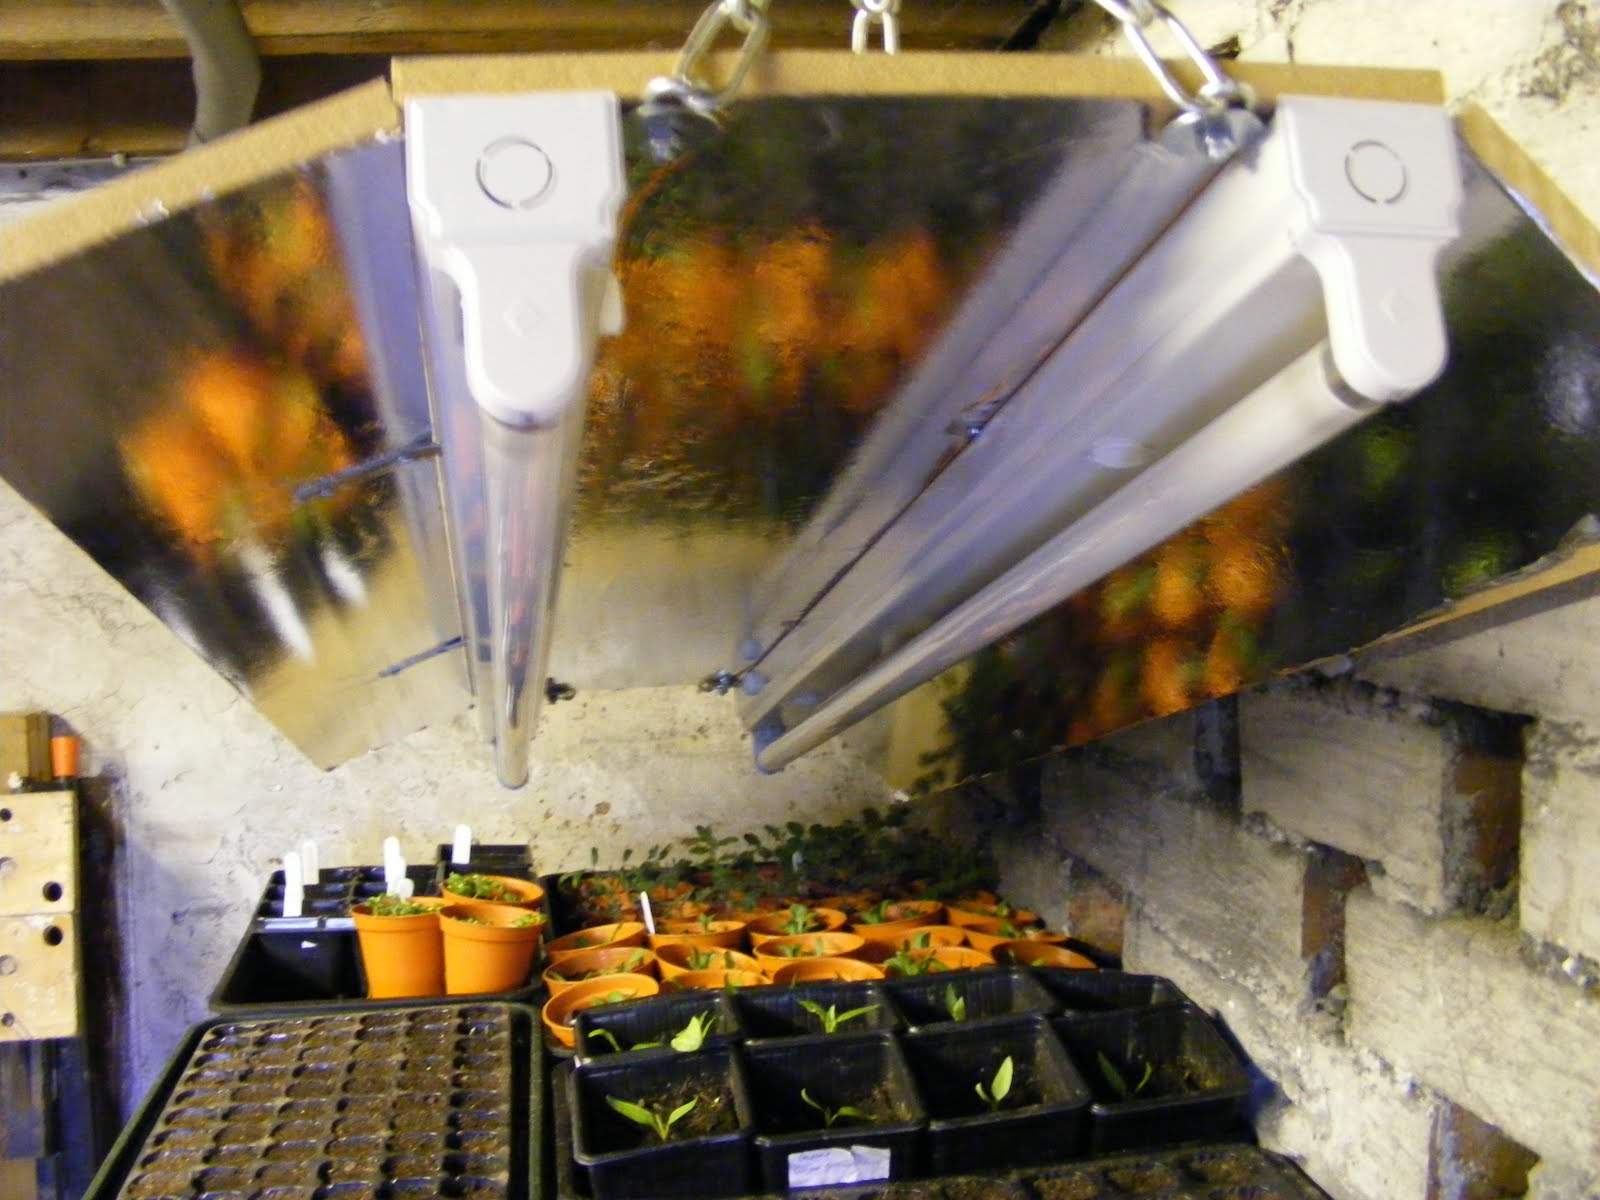
The whole things was then attached to chains and hung from 2 hooks from above. The chains are ideal as you can easily adjust the height by dropping to the next link in the chain.
It is possible to grow plants under standard fluorescent tubes, but it is more effective to purchase tubes that give out less green light and more of the red and blue parts of the spectrum. As we all know, most plants reflect green light, that's why they appear green.
I purchased 2 Sylvania Grolux tubes to replace the standard ones I received with the light fittings. The light produced is much pinker than normal and the plants seem to love it. Using this setup, I have successfully propogated and grown tomato plants, chilli pepper plants, strawberry, onions, chives, lettuces, herbs... and much much more.

I attached the reflector side panels to the main board by using simple metal brackets strips, which are flexible enough to be bent to allow the side panels to be adjusted. They also had holes predrilled in them. I also attached some chain links to the main board at each corner so I could link chains to them in order that it can be suspended.
The light fittings themselves are 4ft in length, but you can buy longer or shorter ones. Be sure you buy lengths that match the types of tubes you wish to use in them. I connected some 3core (including earth) electrical cable to each of the tube light fittings. The light fittings were attached to the underside of the board and the cables passed through the holes I had drilled in the main board.
 On top of the board, I added a light switch for each light (so I can choose to have one or both on) and I then passed the cables in to a junction box. The other side of the junction box has a cable coming out of it with an electrical plug on the end of it. This then plugs in to the mains via a digital timer. This allows you to control the amount of light per day. I have my lights come on at 5:30am and they shut down at 10:30pm - simulating long summer days.
If you are not competant with electrical work, then please have an appropriately trained electrician to do this for you or to check the connections. Loose electrical connections are a fire hazard.
 The underside of the board wasn't very reflective as it was wood colour. So i glued kitchen foil to the underside of the main panel and the side panels to reflect as much light back down to the plants as possible. You could also try plain white paper rather than foil.
The whole things was then attached to chains and hung from 2 hooks from above. The chains are ideal as you can easily adjust the height by dropping to the next link in the chain.
It is possible to grow plants under standard fluorescent tubes, but it is more effective to purchase tubes that give out less green light and more of the red and blue parts of the spectrum. As we all know, most plants reflect green light, that's why they appear green.
I purchased 2 Sylvania Grolux tubes to replace the standard ones I received with the light fittings. The light produced is much pinker than normal and the plants seem to love it. Using this setup, I have successfully propogated and grown tomato plants, chilli pepper plants, strawberry, onions, chives, lettuces, herbs... and much much more.
